Category Archives: journal

Day 30: Daily Calendar/Journal

Standard

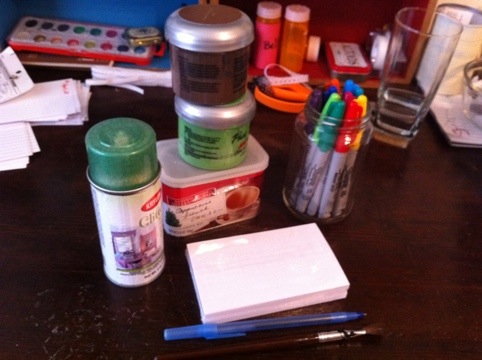
Supplies: Index cards, small box that will fit 183 index cards, paint, markers, other decorating supplies.

20110829-060837.jpg

Time: At least 1 hour

I’ve always tried to keep a journal. I try and then stop and then start back up again. Somehow, my desire for perfect writing and pristine notebooks just killed my journal writing dreams.

Then about a year ago a read about a very simple kind of journal that serves it’s purpose, but doesn’t require a lot of insight.  I know that might sound contradictory to the whole point of keeping a journal, but that’s what I want from it.  So basically this journal involves an index card for each day of the year, but years are not written on the cards.  Each day you find the card for that day, write the current year on it, and write a short sentence about what you did. In several years you’ll have a concise little “this day in history” for your life.  So here’s one way to make your daily journal.

Start with the cards.  You’ll need 183 or 366 index cards.  If you want to have one index card for each day you’ll need 366 (don’t forget a card for leap day!), but you can also use both sides of each card and only 183 cards.

The original idea for this project (I can’t remember where I read about it) suggested using a date stamp, but those are a bit too expensive for me.  Instead, I whipped out my pretty colored Sharpies!  Start writing or stamping the date on each card.  When you get halfway through, flip the cards over and turn the stack 180º.


Now, moving on to the container!  I have a few old cans from fancy coffees my grandma gets and they’re the perfect size.  All you need is something that fits the cards.  I painted my can with a little vine pattern.

My brother recently gave me a collection of craft supplies he had sitting around.  One of the things in the collection was spray glitter!  For the sole reason that I’d never used spray glitter before I decided to add some.  And it’s green!

The nice thing about this project is you can use whatever supplies you have on hand and do anything you want.  Go crazy!  When everything is finished you just need to put the index cards in the container and start journaling!  Get to it!

Back tomorrow,

Alie
Day 9: Fabric Covered Journal and Give Away!

Standard

Supplies: Fabric, scissors, cardboard, X-acto knife, all-purpose glue, ruler, iron, stack of heavy books, embroidery floss/thread, sharp needle

Time: 1 hour to assemble, 3ish hours to dry

Today’s craft was inspired by my need to do something with this beautiful floral fabric I found on sale.

Daphne loves this fabric!

I decided to make a fabric covered journal.  This was not a particularly easy or interesting project to photograph, so I’ll have to make do with what I was able to get.  So here we go.  Start with a piece of thin cardboard twice the size you want your notebook to be.  You’ll fold it in half to make the front and back covers.

early stages of a book

Trace the cardboard twice on the fabric and leave a little extra on the edges.  You’re going to glue the whole piece of cardboard down on the back of the fabric. I used a paintbrush to spread the glue evenly.  (By the way, I added a little embroidered embellishment to the fabric, but that’s totally optional.)

the outside of the box should go on the inside of the book so you can't see through.

Put a stack of books on the cardboard and let it sit for awhile.  The cardboard will want to curl a little after you glue it unless there’s something heavy on it.  Once that side is mostly dry, cover the opposite side of the cardboard with glue and fold the fabric over.  Put it under the books again.

if there's a dog on your book it dries better

Meanwhile, you can cut your pages.  Cut a rectangle that’s slightly smaller than the book cover from another piece of thin cardboard.  Get a little stack of paper and trace the second piece of cardboard on it.  Use a ruler, slice the stack of paper with your X-acto knife and fold the stack in half.

Now go back to the cover.  Trim the extra fabric on the sides so you only have about 1/4” and glue those edges over.  Make sure they’re on the inside of the cover.  Make three dots on the inside of the spine and poke holes through them with a sharp needle.

the biggest, most frightening needle I've ever encountered

Now line up the pages with the cover, thread a needle, and bind the pages to the cover.  There are probably 1000 ways to bind a book, but I’ll tell you how I like to do it.  Here’s a little key: when I say to stitch up, your needle should be going from the inside of the book to the outside and down is the opposite.

1: Stitch up through the middle hole, leaving a tail of thread.  No knots should be happening.

2: Stitch down through the top hole

3: up through the middle hole

4: down through the bottom hole

5: up through the middle hole

6: down through the top hole

7: up through the bottom hole

8: down through the middle hole (this is you last stitch)

On the inside of the book there will be one long strand of thread that goes from top to bottom without an anchor in the middle.  You’ll want to make sure the tail from the beginning and the tail at the end are on opposite sides of that thread.  Tie them in a knot to anchor the long thread down.  Now you can either cut the ends and let them hang or wrap the loose ends around the tied down threads like this:

can you see it? it's a bit small.

With the whole thing bound you can either be done or add a bit more polish to the inside covers.  This is really easy.  Just brush some glue on the pages facing the inside covers and stick the pages to the covers.  Squash it under a book for a couple hours and you’ll have something like this:

And the finished journal:

I love that fabric so much!

This is a lot easier than it seems, but it has a really personal element that will make it a really special gift.  I don’t know if anyone’s reading (besides my mom, thanks mom!), but I’m going to do my first giveaway today.  If you’d like to have this notebook leave a comment below and I’ll pick a random winner on Thursday.  Why Thursday?  No clue.

xo,

Alie